ASIC Miner ICERIVER KAS KS0 Profitability In the realm of cryptocurrency mining, the Iceriver KAS KS0 miner has garnered widespread attention. Tailored specifically for the Kaspa network's KHeavyHash algorithm, it boasts high hashing power and low power consumption, making it an ideal choice for many miners. In this article, we will comprehensively assess IceRiver KS0 profitability while considering the Kaspa market conditions and the attributes of KS0 miner. Kaspa Market Dynamics Kaspa is a vibrant cryptocurrency network aimed at delivering high performance and scalability for everyday transactions. At the time of writing this article, the Kaspa coin trades at approximately $0.04959. But it's essential to note that cryptocurrency markets are highly susceptible to price volatility. Hence, investors must remain vigilant about market dynamics. Additionally, the Kaspa network's mining difficulty and reward mechanisms play a role in mining returns. Attributes of the IceRiver KS...
X11 ASIC Miner Pinidea Dr2 Miner Mining Tutorial
Pinidea Dr2 450MH X11 ASIC is one of the miners for mining Dash coins. The hash rate is 450MH/s, and the power consumption is only 335w. In this tutorial, we will walk you through the setup of this 450MH X11 ASIC miner in detail.
This tutorial also applies to Pinidea Dr2 and Pinidea Dr3.
Miner Specifications
Brand | Pinidea Dr2 |
Hash Rate | 450 MH/s ± 5% |
Power Consumption | 335W |
Cooling | 2 * 12038 fan |
Network Connection | Ethernet |
PSU | NO PSU |
PSU Recommend |
This tutorial will use the Coinmine.pl mining pool as our test pool.
Use the fastest mining pool
Pool connection speeds can vary greatly depending on the country and pool. We know that the connection speed of the mining pool has a significant impact on the mining speed of the miner. In the worst case, miners may fail to start. Therefore, we need to find out the fastest mining pools applicable.
In Windows, use the Ping command to find out the fastest pool.
How to find out the fastest mining pool:
· Press "Win Key + R" and the "RUN" box will pop up.
· Type "cmd" in the text box and press Enter to enter.
· A black box with a blinking cursor will pop up; this is the command prompt.
· Type "ping" and then press the space bar on your keyboard. Then enter the address you want to ping and press Enter, you will get the pool connection result.
· For example, use "ping www.coinotron.com" to test the connection speed to the coinotron pool.
· Test all pools and choose the one with the lowest "average" speed.
· Then, check the help page of the mining pool to get the "pool address" of that mining pool. Usually, the "pool address" is not the same as the "pool URL."
PSU check
· The miner does not have a built-in PSU.
Important note: To ensure that the power supply used by the miner is sufficient. It is recommended that the rated power of the miner's PSU should not be lower than 400W, and the interface should be a 6pin x 2 or 8pin x 2 PSU. Also, we do not recommend using one PSU for multiple miners.
Miner connection
· For miner configuration, make sure the miner and your PC are connected to the same router. (PC is only used for miner configuration)
· Below is the appearance of the miner we received.
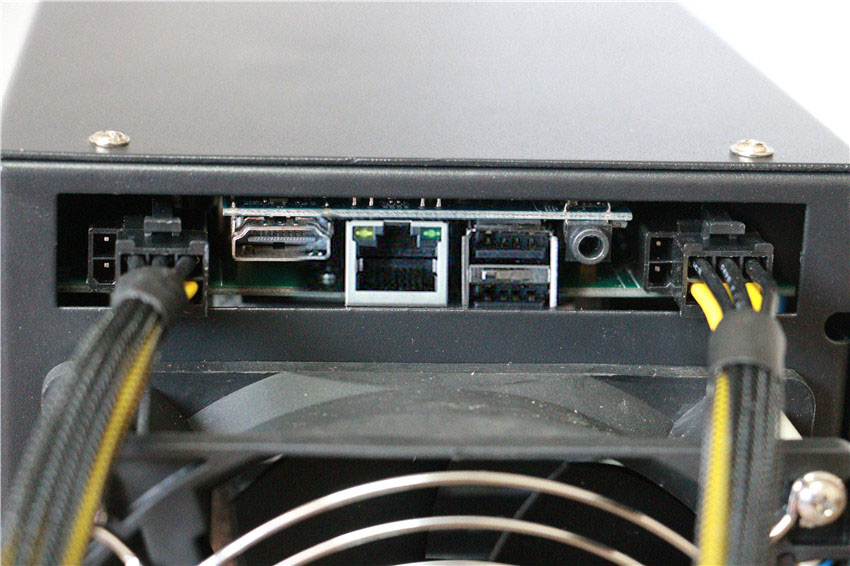
· There are two cooling fans on the miner. Among them, Pinidea Dr2 has two 8pin ports and one Ethernet port.
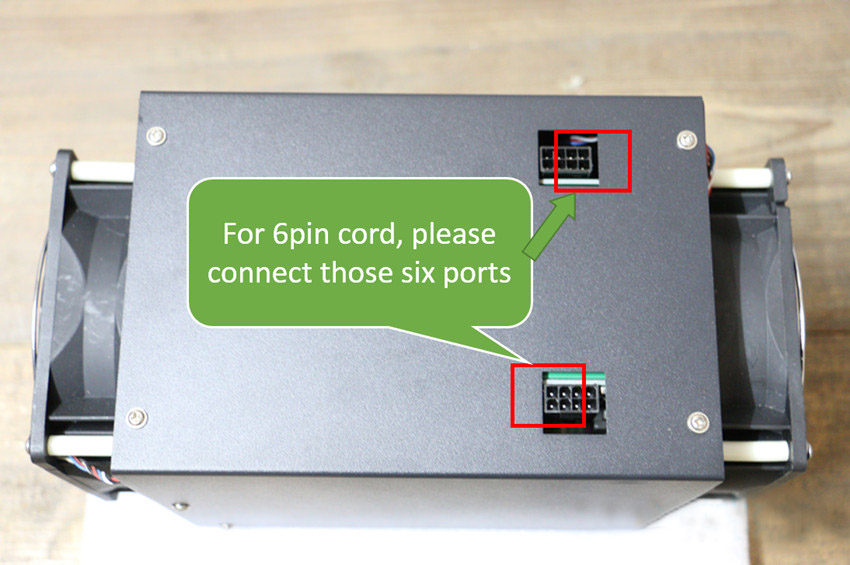
· The 8PIN port of Pinidea Dr3 is located on the miner's top.
· Two 8-pin ports are required to connect the PSU to the miner. However, you can also use a 6pin power cable to connect this 8pin port. In this case, for Pinidea Dr2, you need to connect the 6pin power cable to the right side of the miner's 8pin port. (As shown below)
· For Pinidea Dr3, please connect according to the exact ports shown in the picture. (When the miner is positioned as shown in the picture)
· The following figure is an example of the connection of Pinidea Dr2 6-pin power cable:
· Pinidea Dr3 power connection example diagram:
· Finally, plug in the Ethernet cable to the miner, and the connection of the miner is complete.
Mining guide
· Before starting the miner, please ensure that the miner is correctly connected to the power supply.
· Wait for about 1~3 minutes, and start mining after miners complete initialization.
· Scan the miner's IP address: The miner's IP address will automatically change according to your network environment, so we need to change the "Network Protocol" of the miner to "DHCP." You can refer to the failure article How to use IP Reporter?
· Log in to the miner configuration page: open a browser, and log in to open the IP address you just scanned (for example, 192.168.1.42). Both username and password are "admin."
· If you cannot log in to the configuration page for the first time, it is recommended to wait for 1 minute and then log in to the configuration page again.
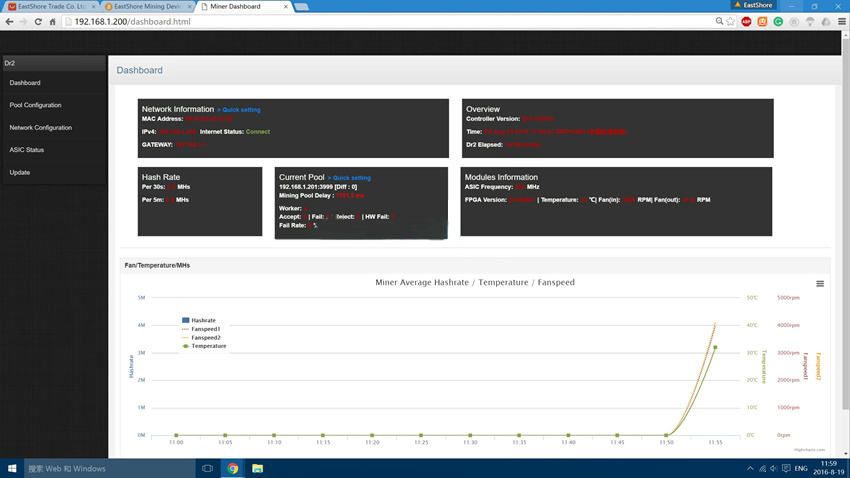
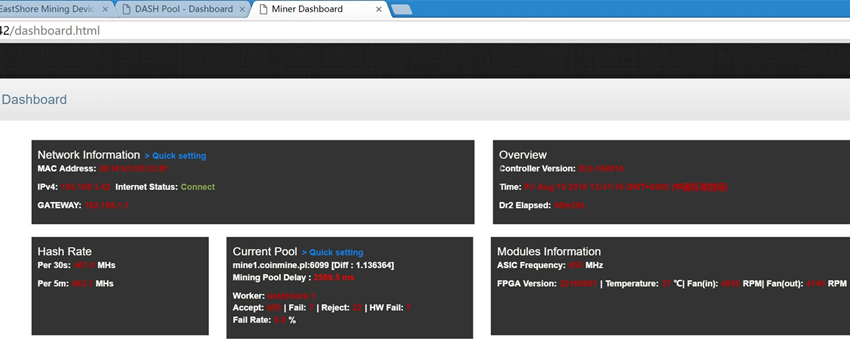
· After entering the miner configuration, we will see the miner's "dashboard." The dashboard of this X11 miner is similar to that of the Avalonminer 6.
· The left side of the configuration page is the central command set by the miner backstage.
· Click the "Pool Configuration" button to configure your mining account. It is recommended to set "Pool URL" and "Pool worker" for three mining pools.
· If you do not know how to set up a mining pool account, it is recommended first to check the "Getting Started" page of the mining pool of your choice and find the mining URL of your mining pool.
· When setting the Pool Url of the mining pool, you also recommend setting three different Pool URLs. If one mining pool fails, miners will automatically switch to another mining pool to continue working.
· If you are mining with CoinMine.pl, you should always keep using the full URL, including the port number as the mining URL. That is: use stratum+tcp://mine1.coinmine.pl:6099 or stratum+tcp://mine1.coinmine.pl:6090 as the mining address.
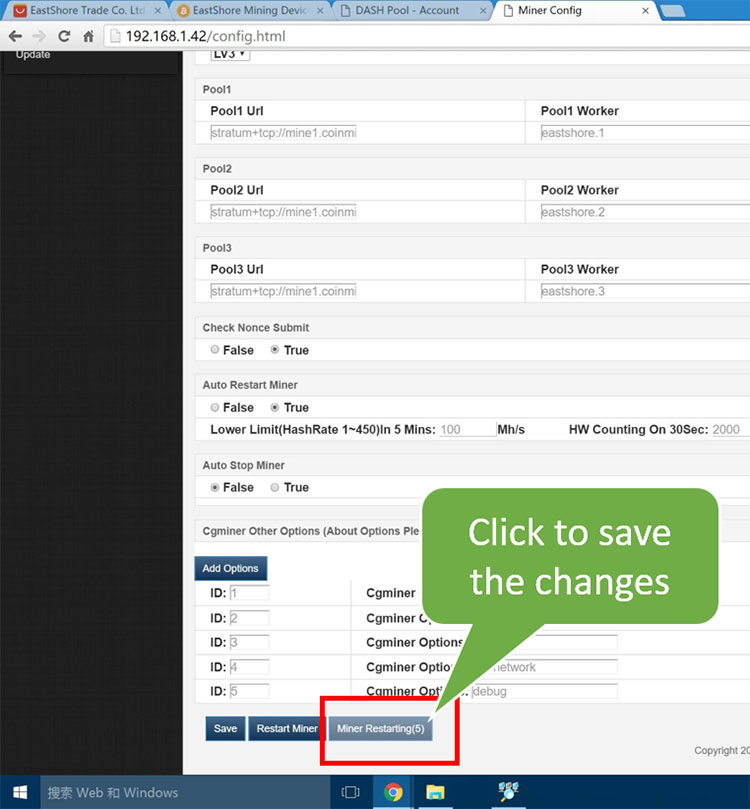
· Other options on the "Miner Config" page do not need to be changed; just keep the defaults.
· Click the "Save & Restart" button at the bottom of the "Miner Config" page to save the configuration.
· Wait about 5~10 minutes, mining will start automatically.
· Go to the Dashboard page in the miner's backstage to monitor the miner's mining speed.
· The mining speed graph per 5 minutes will be displayed as follows. (It will automatically update every 5 minutes)
· If you have not started mining for a long time (for example, 15 minutes), and the miner is displayed as "x" in the Dashboard, you need to re-navigate to the "Pool Configuration" page and set the mining pool configuration, save the update and restart again.
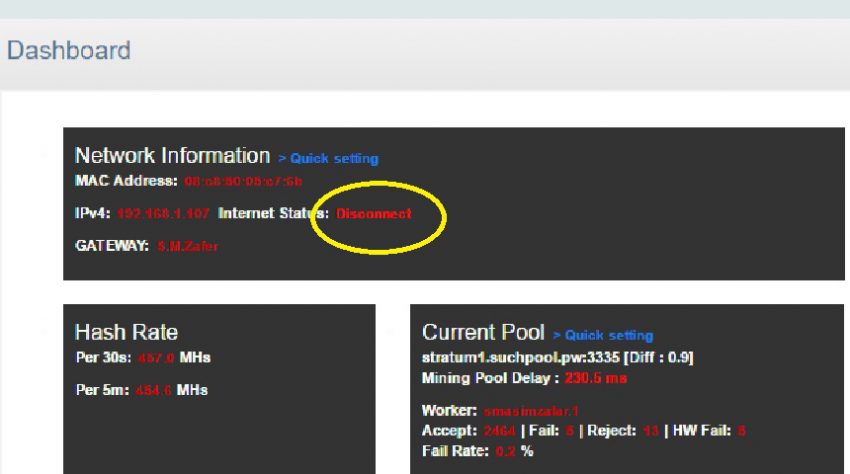
· If the miner is working fine in terms of hash rate, however, the "Internet Status" on the Dashboard shows "Unknown" or "Disconnected" as shown in the image below. This is just a network detection error caused by different network environments. However, the performance of the product is not affected.
Notes
· Control fan speed
It is not recommended that you change the fan speed. The higher the fan speed, the cooler the mining environment of the miner. On the other hand, lower fan speeds may cause the miner to overheat. High temperatures may damage the miner.
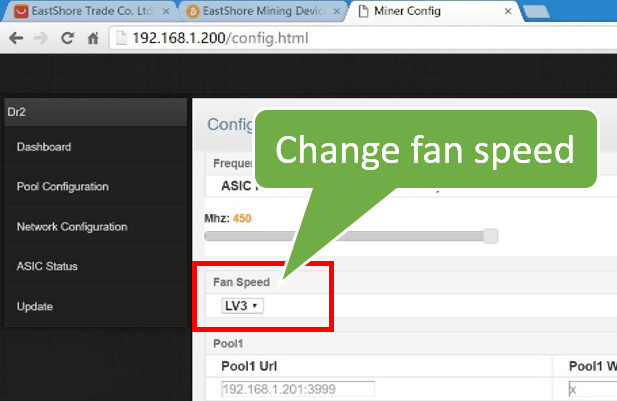
If you want to lower the fan speed to reduce noise, you can control the fan speed by changing the Fan Speed level setting on the Pool Configuration page.
The default value for the fan speed is "LV3". You can change it to a lower level; after changing the fan level, pay attention to the "Temperature" value on the dashboard. Make sure the temperature displayed backstage should not be higher than 50 degrees.
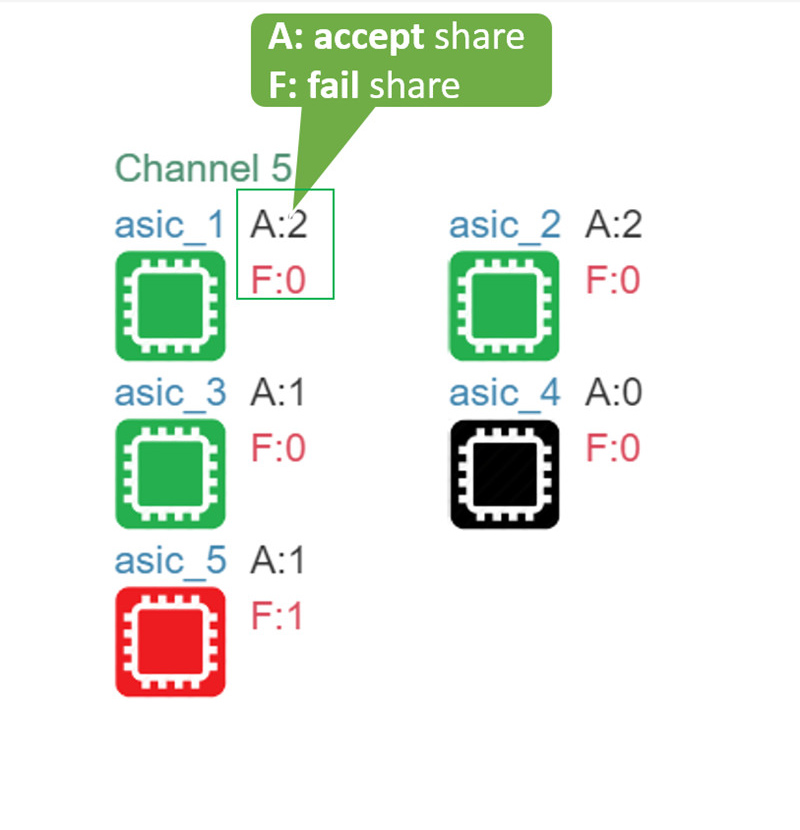
· ASIC Status page: There is an ASIC Status page in the Dashboard.
The ASIC status page shows the operating status of each chip. If a chip's color is "green," it means that it has a successfully accepted share. If a chip's color is "red," that chip has fault sharing. If a chip is colored "black," it means that it did not successfully accept shares or produced failed shares (may be rejected or produce duplicate shares).
Mining tips
If you are running multiple miners at the same time (<= 10 miners), please note the following tips:
·Heat output
The miners should be positioned so that the hot exhausted air cannot be re-inhaled by other miners.
· If you connect multiple miners into one power supply, you need to: Check the maximum rated current of the power supply; if it exceeds the rated current, the miner may stop working.
Troubleshooting
For your troubles, try the following suggestions:
· Check your home network, mining pool to ensure all networks are working well.
· Check if your miner is configured correctly. Typically, you need to set the "POOL URL" on the configuration page to the entire URL, including the port number.
· Check that all ports on the miner are correctly connected to the miner.
The content and pictures of this article are from the Internet, compiled and edited by ZEUS MINING.










Comments
Post a Comment
Tell us your opinion